

Summary
As a print business owner, you’re always looking to save time, reduce costs, and improve your processes. One of the best ways to accomplish this is by creating DTF (Direct-to-Film) gang sheets. If you’re not familiar with the term, a gang sheet is a method of arranging multiple designs on a single sheet to utilize your material, minimize waste, and increase print efficiency.
But let’s be honest—creating gang sheets isn’t always plain sailing. Many businesses face common issues, such as wasting materials, design adjustments taking too long, and optimizing print layouts. This guide will walk you through creating a gang sheet and show you how to solve these problems with the right tools and techniques.
How to Create Ready-to-Print Gang Sheets
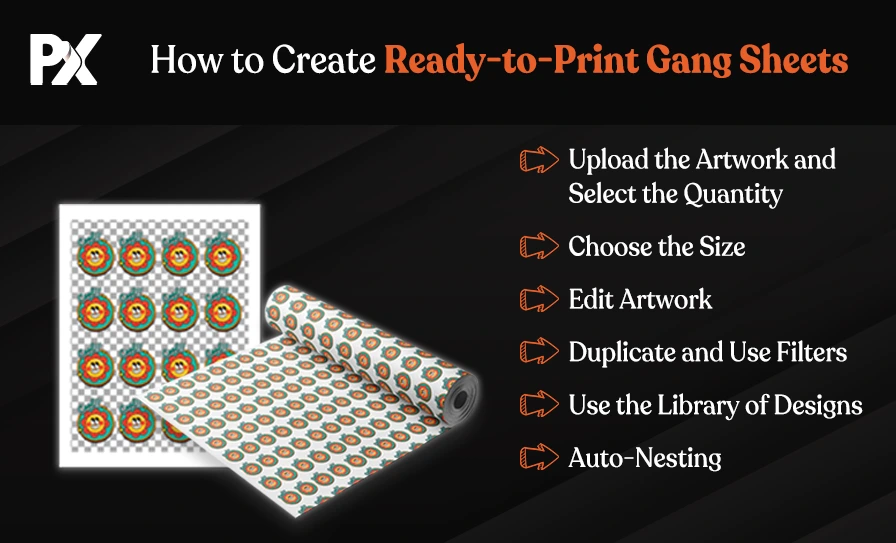
Step 1: Upload the Artwork and Select the Quantity
The first step to creating a gang sheet is to upload your artwork into the design tool. As a print business, you’ll have multiple designs from various clients, and each one will have different specifications. Imagine you need to print 50 custom t-shirts, each with a different design. In such a case, you can implement a workflow with a tool like PrintXpand’s DTF Gang Sheet Builder that allows you to upload multiple designs at once and arrange them on the gang sheet — a key time-saver.
Once uploaded, you can implement quantity control by selecting exactly how many copies of each design you want on the gang sheet. Depending on your order volume, you may need to adjust the quantity for each design. Being able to do this quickly and efficiently helps you manage even the toughest jobs.
Even after uploading, the real challenge is making sure your files are truly print-ready. Low-resolution artwork, missing transparency, or the wrong color profiles can derail an otherwise smooth job. Instead of worrying whether to use PNG or SVG, focus on consistency! Upload files at 300 DPI or higher, ensure transparency for clean edges, and always convert text to outlines.
Better yet, you can implement PrintXpand’s DTF Gang Sheet Builder and automatically do preflight checks at this stage. The system flags low DPI, missing transparency, or incorrect color profiles instantly, eliminating guesswork and saving your team from costly reprints.
Step 2: Choose the Size
One of the biggest problems print businesses face is choosing the right size for their gang sheet. If you use a sheet that’s too big, you’ll waste material; if the sheet is too small, designs will overlap or get cut off. Getting the size right is key to optimizing material usage and print quality. Choosing the right custom size ensures your designs are placed efficiently. You need to consider the design dimensions and how much space each design will take up, ensuring there is no wasted space on the sheet.
| Expert Tip: | |
|---|---|
| When enabling self-design, make sure the tool automatically restricts logos from being stretched beyond their aspect ratio and keeps all elements within print-safe boundaries. These two checks alone can cut reprint rates by up to 70%. Adding pre-set templates for uniforms, jerseys, or tees gives non-designers a head start and reduces abandoned carts from customers overwhelmed by a blank canvas. | |
The tricky part with gang sheet sizing is making sure you’re not wasting space or running out of it. A sheet that is too big wastes costly material, while a sheet that is too small forces reprints or overlaps. For busy print shops, the challenge is standardizing sheet sizes across orders while still maximizing every inch of film.
Here’s where you can implement a smarter solution with PrintXpand’s Gang Sheet Builder. You can choose from pre-set industry-standard sizes or define custom sheet dimensions. The tool uses live previews and auto-sizing to simulate layouts in real time, ensuring designs fit perfectly and material usage stays under control. Over time, this implementation can help you reduce waste, achieve predictable costs, and speed up turnaround.
Step 3: Edit Artwork
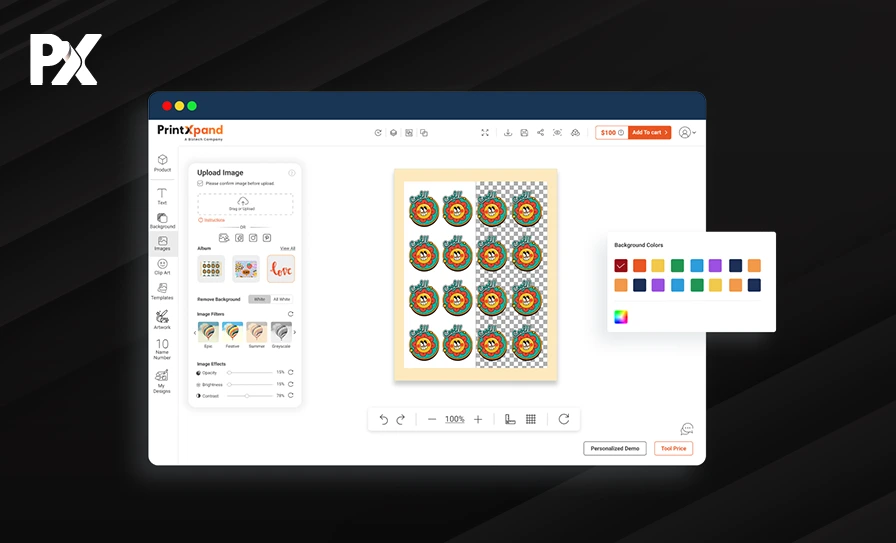
Before you start arranging your designs, make sure the artwork is clean and ready to print. This means editing to remove any backgrounds that will detract from the final product. Suppose a client gives you a logo with a white background. Without background removal, the design will look odd on transparent film or fabric. This minor edit ensures the final product looks crisp and professional.
Clear artwork is significant when printing designs with logos or intricate elements.
You’ll also need to resize or crop your designs to fit within the gang sheet. These minor tweaks may seem time-consuming, but they are essential to ensure designs are sharp, professional, and print-ready. Background removal is crucial for logos or text-based designs, so make sure to remove anything that will affect the quality of your prints.
Many printers ask whether specialized software is always required for editing. In reality, most gang sheet builders can already include background removal and resizing features, which are sufficient for standard jobs. This way, you don’t need extra software for standard jobs, and you can prepare artwork in minutes while keeping your workflow fast, error-free, and production-ready.
Step 4: Duplicate and Use Filters
Once the designs are uploaded and edited, you can use duplication to maximize the use of each gang sheet. One of the biggest advantages of gang sheets is that you can duplicate the same design multiple times, maximizing the use of your film and saving costs.
You can also implement filters or minor design tweaks when variations are needed, for example, creating multiple color options or adjusting layouts for a large order. This gives you flexibility without needing to prepare new artwork from scratch.
If you’re producing multiple shirts with the same logo but in different sizes or colors, you can implement smart arrangement by placing those variations on the same gang sheet. This streamlines production, keeps everything organized, and ensures that no variation is missed.
Many businesses ask whether duplicates in different sizes should go on separate sheets. In most cases, you can implement the more efficient approach by grouping all the items on one gang sheet. This reduces material usage, minimizes the chance of reprints, and keeps your workflow consistent.
Step 5: Use the Library of Designs (If Available)
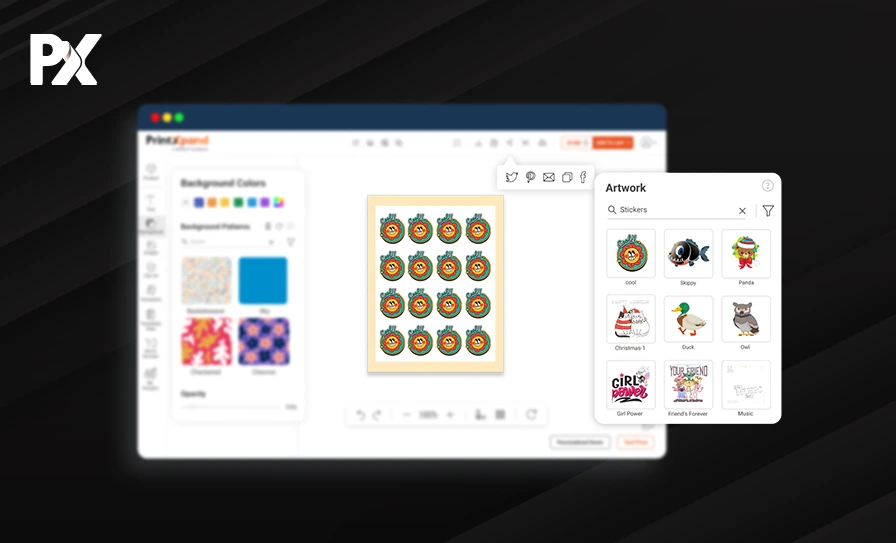
For businesses short on time or resources, you can implement the use of a design library to speed up the gang sheet creation process. If your design tool provides pre-made templates or artwork, you can implement these resources instead of building every design from scratch, saving valuable time and effort.
This approach is especially useful when you’re handling large batch orders with common elements or designs that only need slight modifications. You can implement quick selection from the library, customize as needed, and add those designs directly to your gang sheets. This keeps the workflow fast, consistent, and efficient.
Step 6: Auto-Nesting
You can implement auto-nesting to efficiently create gang sheets by automatically arranging designs so they fit together as tightly as possible. Auto-nesting uses an intelligent algorithm to determine the most economical layout, reducing material waste and making your print job cost-effective.
By implementing auto-nesting, you can automatically select the smallest possible sheet size, saving both time and material. This becomes especially valuable when you’re printing large quantities of orders.
For example, if you’re producing 200 t-shirts with different designs, you can implement auto-nesting to arrange them all in seconds — a process that would otherwise take hours if done manually.
Put simply, you can implement auto-nesting to let the tool arrange everything instantly, saving time while minimizing waste.
Even with automation, you can implement a best practice of leaving at least a 0.25-inch margin between designs. This prevents trimming errors and ensures clean, professional cuts.
From here, you can implement manual nesting adjustments when needed, such as working with irregular shapes or fulfilling client requests for specific placements. While auto-nesting solves most layout needs, you can still implement light manual edits for complete precision.
| Expert Tip: | |
|---|---|
| If your software allows, review the nesting simulation preview before printing. Seasoned printers know that algorithms optimize for space, not necessarily production speed. For example, if multiple small designs are scattered across the sheet, your cutter might take longer to trace all those movements. By slightly adjusting placement, grouping similar shapes or aligning designs in cutter-friendly paths, you can shave minutes off each run. Over hundreds of sheets, that time saved can equal hours of extra productivity. | |
Don’t Use Canva to Build Gang Sheets for Your Business
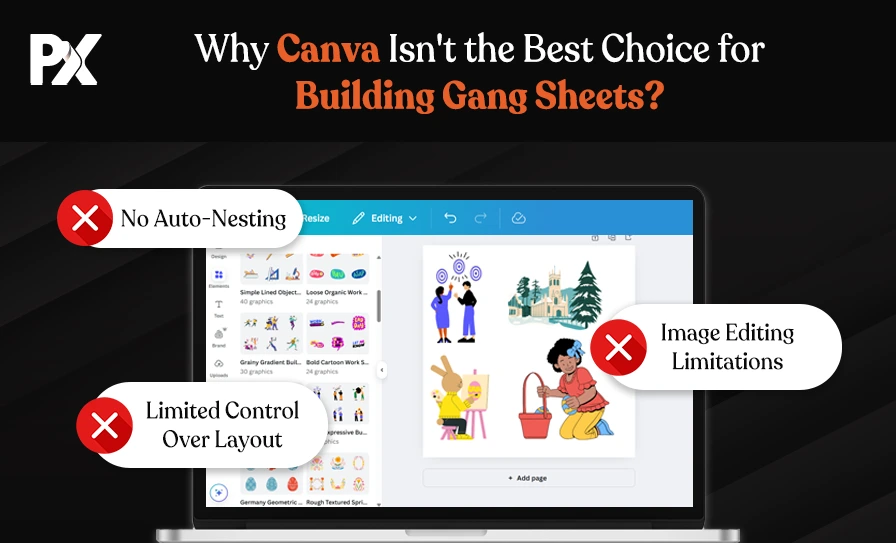
- No Auto-Nesting: Canva doesn’t have auto-nesting. So, you will have to arrange designs for printing manually and set up the layout, spending a lot of your valuable time on mundane tasks.
- Limited Control Over Layout: Canva’s drag-and-drop design tools are not meant for the precision required in gang sheet creation. You need control over spacing and alignment to ensure designs fit perfectly.
- Image Editing Limitations: Canva has basic image editing but lacks advanced background removal tools, resizing options, and, most importantly, quality checks like DPI verification, which are necessary for professional print jobs.
In short, if you’re looking to build gang sheets for bulk printing or DTF jobs, Canva is not the tool for you. You need a specialized DTF gangsheet builder to create gang sheets efficiently and handle the complexity of printing multiple designs in one go.
The Bottom Line
Creating DTF gang sheets is not as complicated as it seems; with the right tools, you can implement the process smoothly. By following the steps in this guide, like uploading your artwork, selecting the correct size, editing your designs, duplicating, and auto-nesting, you can optimize your workflow and minimize waste.
If you want to take your print process seriously, start experimenting with ready-to-print gang sheets and utilize the features that maximize the potential of every print job. Apart from the ease of getting multiple designs printed at once, the right solution also allows you to select the output format (PDF or PNG) according to your requirements.
If you’re tired of dealing with the simplest issues when printing multiple designs at once and need a gang sheet builder for your WooCommerce, Shopify product design tool, or any other platform, you can get started right away.
See how easily you can improve efficiency, reduce waste, and streamline your print workflow with the PrintXpand DTF gang sheet builder.
All product and company names are trademarks™, registered® or copyright© trademarks of their respective holders. Use of them does not imply any affiliation with or endorsement by them.


