

Walk into any gift shop. Look around. Mugs with names. Phone cases with someone’s dog on them. Canvas prints of vacation photos. This isn’t niche anymore — personalization has become what people expect by default.
Now, here’s what running a print business with custom orders used to look like. Endless email threads. Customers sending files in weird formats and your design team spending hours fixing things that should’ve taken five minutes. Production delays. Frustrated customers. The whole mess.
Web-to-print tools threw that playbook out the window. These platforms put design capabilities directly on your website. Customers create what they want, the system generates print-ready files, and orders flow into production. Clean. Simple. No chaos in between.
What follows is a complete breakdown — setup, features worth paying for, marketing tactics, and the mistakes that’ll quietly kill your sales.
What Is a Web-to-Print Tool & Why It Matters Today
A web-to-print tool is software that gives design control to your customers. They land on your product page, fire up an editor, drop in their text or images, preview everything in real-time, and place the order. Your end? The system starts with a production-ready file—no manual intervention.
This means no more, “Can you shift the logo slightly left?” or “Actually, make the font bigger” or the worst of all, “Wait, I changed my mind on the color.”
The customer handles it themselves. They decide on logo placement, font size, color palette, and all the other design variables. Your team stays focused on production, instead of playing email ping-pong.
Personalization is baked into everything these days. Spotify curates playlists based on your listening habits. Netflix knows what you’ll binge before you do. Amazon recommends stuff you browsed weeks ago. People carry these expectations into physical products too.
Print businesses face a choice here. Figure out custom orders at scale, or watch competitors with web-to-print tools pull ahead. That’s really what it comes down to.
Step-by-Step Guide: How to Sell Custom Products Using a Web-to-Print Tool
Here is an easy-to-follow 5-step guide to help you start your process upgrade journey with an online product designer tool.
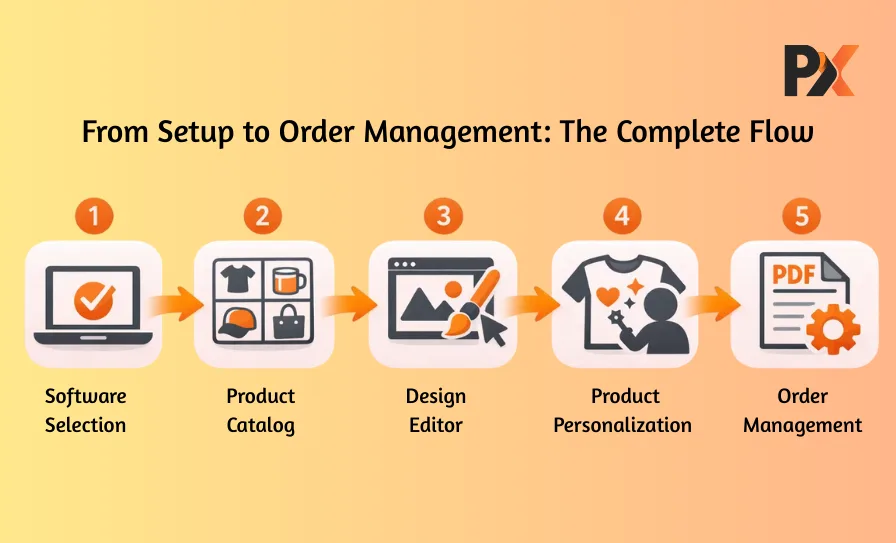
Step 1: Choose the Right Web-to-Print Software
Most people get this wrong. They sit through a slick demo, get impressed by features they’ll never use, and sign up without thinking it through. This is not the right approach.
Here’s what you need to do instead:
- What products am I actually selling?
- How many orders per month — realistically?
- What’s my current eCommerce setup? Shopify? WooCommerce? Magento? Something custom?
The answers shape everything. A platform built for enterprise commercial printers makes zero sense for a small Etsy-style operation. And vice versa. Another thing that you need to know is tool integration.
Integration is the thing nobody thinks about until it’s too late. A powerful online product designer tool becomes a headache if it fights with your existing store. You want plug-and-play, not a six-month IT project.
Step 2: Set Up Your Product Catalog
Software’s in place? Good. Now the unglamorous but an important task. Building the foundation of your services and expertise.
You’ll need to:
- Upload product images (high quality, multiple angles)
- Define customization zones precisely
- Configure pricing rules and variant options
- Set up size charts, color swatches, and material choices
This stage is where attention to detail pays off big. Sloppy setup equals confused customers and a pile of support tickets.
For example, if you are selling hoodies, you need to decide on every specification — can customers print only on the front? Front and back? Sleeves? Spell it out clearly in your system. Ambiguity now creates problems down the line.
Step 3: Enable the Online Design Editor
Here’s the heart of everything. Your design editor transforms a boring product listing into something people actually want to interact with.
What it needs to do:
- Text editing with decent font options
- Image uploads that don’t break
- Color pickers that make sense
- Drag-and-drop element positioning
- Real-time preview — this one’s non-negotiable
But features alone don’t cut it. Execution matters more. Someone who’s never touched Photoshop should figure out your editor in under thirty seconds. If there’s a learning curve, you’ve already lost them.
Mobile responsiveness isn’t a bonus anymore, by the way. It’s expected. Half your traffic is probably coming from phones. If the editor feels clunky on mobile, that’s half your potential sales walking away.
Step 4: Allow Customers to Personalize
Once the editor tool is live, customers can start creating their own personalized products. Here’s a tip that’ll move the needle immediately — don’t drop people onto a blank canvas. Use templates, a lot of templates.
You can add pre-designed layouts for some of the popular themes/use cases, like:
- Birthdays and celebrations
- Corporate events and conferences
- Weddings and anniversaries
- Sports teams and clubs
- Holiday seasons
Some folks want complete creative freedom. Most just want to swap a name, pick a color, maybe upload one photo, and be done. Give them that option.
A smart product customization tool walks this line carefully. Enough flexibility to feel personal. Enough guardrails to prevent overwhelm. Finding that balance takes experimentation — what works for custom jerseys won’t work for business cards.
Step 5: Manage Orders with Print-Ready Files
Here’s where a web-to-print tool earns its keep. Like, really earns it. Customer wraps up their design. Hits checkout. But that doesn’t imply your team is on its own, instead,
The system automatically generates:
- High-resolution PDF
- Correct CMYK color profiles
- Proper bleed and trim settings
- Job-ready file naming conventions
The file that checkmarks all these things lands in your production queue without anyone on your team lifting a finger. No designer is reviewing every single order. No manual prep work. No “oops, wrong color space” fires to put out.
Order management dashboards pull everything together. What’s pending approval. What’s in production. What shipped yesterday. Some platforms even spit out job tickets with QR codes — your floor staff scans and pulls up order details instantly. The automation stacks up. What took three people to manage before now runs itself.
Must-Have Features of a Good Web-to-Print Tool
Want to get yourself a web-to-print tool to expand your print business capabilities? Here are some of the non-compromising features:
Online design tool — The foundation of any web-to-print tool. Text, images, clipart, layers. The interface should feel obvious to complete beginners. If someone needs a tutorial, it’s too complicated.
3D preview — Flat mockups don’t tell the whole story. Customers want to spin that mug around, see the design wrap, and visualize the actual thing they’re buying. This feature alone crushes return rates.
Template management — You need systems to organize, categorize, and update templates. Even better if customers can save their own designs for reordering later.
Print-ready PDF generation — Automatic output with color conversion, resolution checks, and bleed handling. Still prepping files manually? You’re burning time and money.
Multi-language and multi-currency — Selling across borders? Your platform should handle localization without forcing separate storefronts for each market.
Order management automation — Job tickets, production queues, status updates. Less manual babysitting, fewer things slipping through cracks.
Benefits of Using a Web-to-Print Tool for Selling Custom Products
So what’s the actual payoff? Let’s get specific.
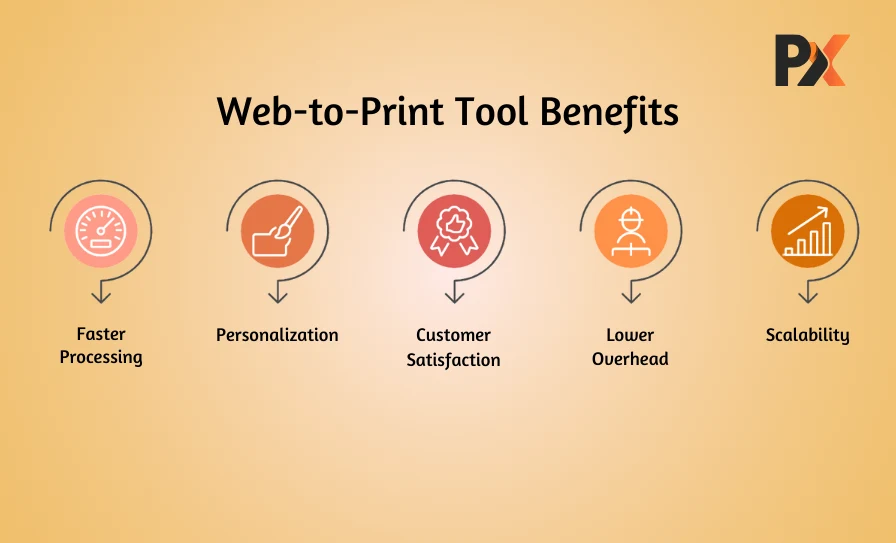
Faster order processing — Manual steps disappear. What dragged on for hours now wraps up in minutes. Your bottleneck shifts from “waiting on files” to “keeping up with production.”
Deeper personalization — Customers build exactly what they want. They’re invested in the outcome. That translates to higher cart values and a stronger emotional connection to the purchase.
Happier customers — Real-time previews eliminate guesswork. What they see is what they get. Fewer “this isn’t what I expected” complaints. Fewer returns eating into margins.
Lower overhead — Less manual file handling means fewer people needed for the same volume. Those resources go toward growth instead of administrative firefighting.
Scalability that doesn’t break — A solid web-to-print tool handles ten orders the same way it handles ten thousand. Your tech scales even when headcount doesn’t.
Marketing Strategies to Sell More Custom Products
Great technology sitting there won’t generate sales on its own. You need to drive traffic and convert it.
Lead with templates — Cannot stress this enough. Templates lower friction dramatically. Build collections around occasions — graduations, holidays, pet birthdays, corporate gifting seasons. Make it stupid easy for someone to find something relevant and tweak it in two minutes.
Upsell through personalization — Customer just finished a custom t-shirt design? Show them matching items. Caps. Totes. Stickers. The creative work is done — extending it feels effortless on their end.
Go niche, go deep — Generic marketing appeals to nobody. Target specific communities instead:
- Dog owners
- Yoga studios
- Real estate agents wanting branded swag
- Gaming communities
- Local sports leagues
The narrower your focus, the stronger your message resonates. Conversion rates follow.
Common Mistakes to Avoid When Selling Custom Products
Watched plenty of businesses stumble here. Don’t repeat their errors.
Ugly templates — If your starting designs look like they’re from 2010, customers assume your products are cheap. First impressions stick. Invest in templates that reflect current design trends.
Confusing interface — Every extra click is a chance to lose the sale. Every moment of confusion pushes someone toward the exit. Ruthlessly simplify.
Laggy editor — Performance kills deals quietly. If your design tool stutters, freezes, or takes ages to load — people leave. They don’t complain first. They just leave. Test your editor speed constantly.
No live preview — Asking customers to imagine the final product is asking too much. They need to see it. Real-time. On the actual product mockup. Non-negotiable.
Conclusion
Selling custom products really doesn’t demand a massive operation or tangled processes anymore. The right web-to-print tool handles the complicated parts — design interface, file generation, order flow — while you focus on revenue and growth.
And personalization isn’t a trend that’s peaking. Customer expectations keep climbing. The businesses investing in this tech now are positioning themselves to grab market share while everyone else scrambles to catch up.
PrintXpand offers a complete web-to-print solution for businesses serious about scaling custom products. Intuitive design editors. Automated production workflows. Everything needed to turn personalization into consistent profit. Curious what it could do for your operation? Get in touch with the PrintXpand team and find out.


